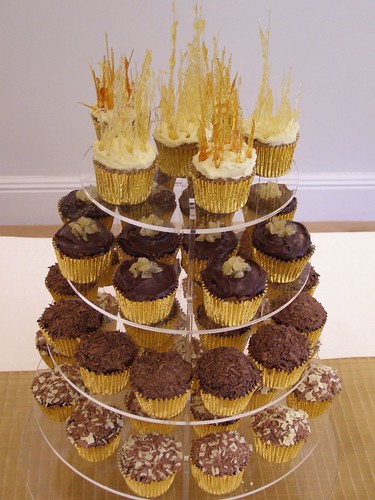
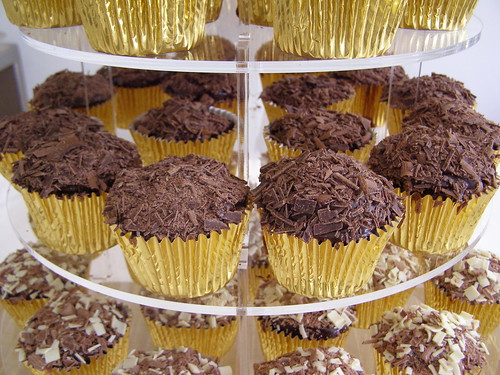
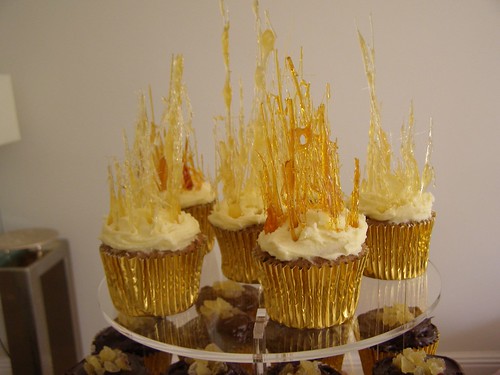
 You will see from the photos and posting below that I recently made some cupcakes for a friend’s 40th birthday party. As well as the chocolate cupcakes featured above I made some ‘flame cupcakes’ that I put on the top of the cakestand. These looked great and everyone asked me how I made them. As the creation was to replace an actual birthday cake, they had the appearance of flames on the top of the cakestand.
I used a maple cupcake sponge with maple syrup buttercream and then made the sugar flames for the top. This isn’t the easiest thing to do but with some patience and a lot of trial and error you can make some dramatic cakes.
The recipe and instructions are set out below. This will make 12 cupcakes. As to get some really good ones there is a bit of trial and error I suggest making all 12 even if you end up with only 4 or 5 really good flame cakes. The others are tasty even without the sugar shards:
Maple Cake Ingredients
60g butter, softened
150g self-raising flour
1 teaspoon cinnamon
110 g dark brown sugar
60ml maple syrup
2 eggs
Maple Buttercream Ingredients
90g butter, softened
160g icing sugar
3 teaspoons maple syrup
Sugar Flames
330g caster sugar
250ml water
Equipment required
1 12-hole muffin pan tray
muffin cases
large heavy based saucepan
sieve
large mixing bowl
electric whisk
• First preheat the oven to 180 degrees Celsius or 160 if it is fan assisted.
• Put the muffin cases in the muffin tray
Cakes
•Put butter, sieved flour and cinnamon, sugar, maple syrup and eggs in a large mixing bowl and beat with an electric mixer on slow speed until all the ingredients are mixed together. Increase the speed until the mixture becomes paler.
• Divide the mixture amongst the 12 muffin cases and bake for 20-25 minutes until the cakes start to brown and are firm to the touch.
• Divide the mixture amongst the 12 muffin cases and bake for 20-25 minutes until the cakes start to brown and are firm to the touch.
Buttercream
While the cakes are cooking you can make the buttercream but it shouldn’t be put on the cakes until they are cool (which won’t take long).
• Sieve the icing sugar into a large bowl and beat in the softened butter and maple syrup. I find using a metal the spoon the easiest way to do this, pushing the butter against the bowl using the back of the spoon. Eventually it will all come together in a nice creamy buttercream.
• Using a teaspoon spread the buttercream generously on top of the cakes.
Sugar Flames
Now for the fun bit!
• Combine the sugar and water in a heavy based saucepan.
• Combine the sugar and water in a heavy based saucepan.
• Stir over the heat continuously until the sugar dissolves being careful that it does not boil.
• Once all the sugar has dissolved bring it to the boil. Then reduce the heat and leave the liquid to simmer.
• The liquid will start to become golden brown. This will take quite a while (maybe 20 minutes) but it must become this colour before making the flames. If you have a candy thermometer then the mixture should be between 138 degrees Celcius and 154 degrees Celsius. It is not essential to have one however as it is the colour that tells you it is ready to use.
• Remove from the heat and allow the bubbles to subside.
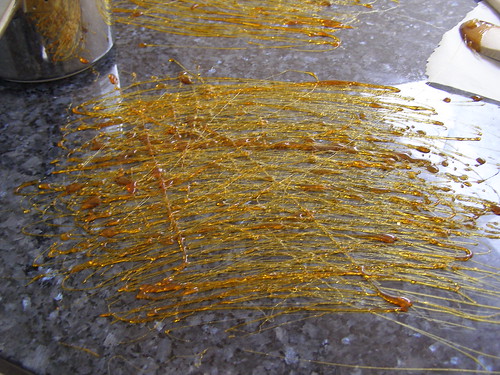
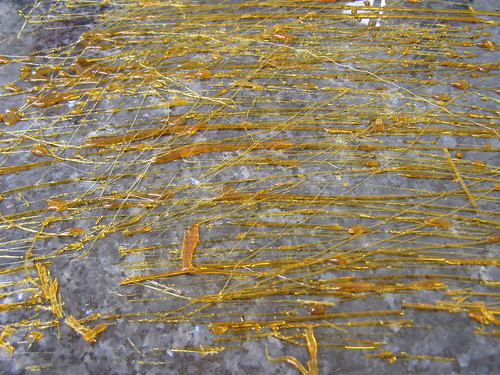
• I then use a granite worktop but you could just use greaseproof paper or a glass chopping board to make the shards. Dip a wooden spoon in the mixture and then drizzle it on to the granite worktop or greaseproof paper moving the wooden spoon back and forth. Here are some photos of the drizzled sugar.
• Allow the sugar to set at room temperature and then using a sharp knife or a metal spatula. It will break up so just keep lifting some off and you get some long strands. Arrange it on the cake with shorter shards at the back and longer ones at the front to give a dramatic effect.
Tips
My tips for these cakes would be:
• Make plenty of sugar shards and work then quickly. Drizzle the sugar syrup and then start to try and lift it fairly quickly to see if it is set. If it is left for too long it goes too brittle.
• Don’t make them more than a day ahead – the next day the sugar starts to melt a bit and they don’t look good. It is fine to make the morning of an afternoon or evening party.
• Place the shards firmly into the buttercream and the cake so that they don’t fall over.
Making the sugar flames